EPSON's Next Generation — The world leaders in print quality go super wide, while introducing lots of improved technology
UPDATE August 30, 2007 -- Movies of Eight 3D Gamut Comparisons Added
UPDATE October 23, 2007 -- Details of the inkset(s) for all four of the new machines has been updated in three places as noted with an asterisk *.
Epson Stylus® Pro 11880, 9880, 7880, 4880, Epson UltraChrome K3™ with Vivid Magenta
One has to wonder if there will soon be an end to printer development, as the quality of the machines is getting to be so good that further improvements would seem to be impossible. Nevertheless, the printer companies continue to give us more of what we want, at a rapid rate, coming ever closer to perfection with respect to ink and the application thereof to paper.
In a departure from the routine, news about the latest generation of professional, wide format printers from Seiko Epson Corporation is emerging over a period of many weeks, rather than all at once. The worldwide announcement date was apparently July 17th, but Epson America will follow with their own announcement on August 31st. In any case, the news is good.
For one of the press-release-based articles on the details of the flagship of this new product line, try: http://www.pictureline.com/products/14609/Epson_11880_Stylus_Pro/
And no, we'll not get everything we wanted in this next generation of machines, but we can again see major progress toward the ideal inkjet printer.
The Stylus Pro 4800, 7800 and 9800 are being updated to the SP4880, 7880 and 9880. I'll start off with what I've been able to learn about the updates to the existing models, by talking, reading, and reading between the lines -- but not by testing one myself.
Then I'll get into the story for the all-new Stylus Pro 11880, a 64-inch giant, about which I can add more specific observations because I do have one of them.
Some of the qualities of the printed output I can see from the 11880 may or may not carry over precisely to the improved output of the three smaller machines.
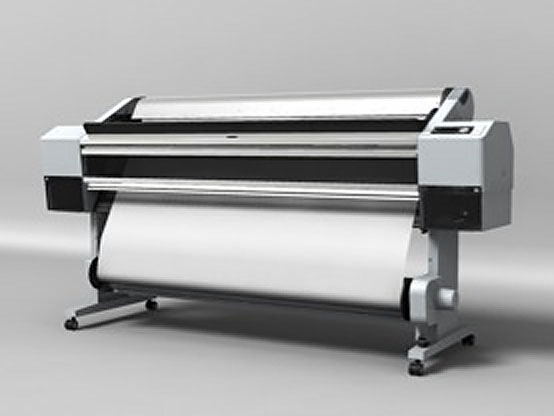
First, the SP4880, 7880 and 9880 include updated features that didn't require changes to very many parts. Here is a picture from EPSON (from a soon to be released PDF by Epson America) of the new 7880 -- looks just like the 7800. Notice also that the simulated print coming out is a cropped version of a picture by none other than yours truly: http://www.josephholmes.com/pages/007.html
 |
The changes to these three printers include:
1) More advanced "MicroPiezo® AMC™" print head, still with 8 channels. The new head has:
A) New "ink repelling coating technology" on the surface to reduce head clogging and cleaning hassles, especially with linty or dusty papers (fine art papers of some kinds) and to make the new, more demanding inkset work. The heads are much the same as those in the Stylus
® Pro 3800, but with this ink repelling coating added, in order to prevent the new inks from causing serious trouble. The new inks cannot safely be used in the earlier printer models. The Vivid Magenta is said to be especially problematic for heads without the ink repelling coating, and to completely ruin such a head within about six months of use. I'm assured that Epson would prefer to be able to offer this inkset as an upgrade to their customers who own the SP3800, 4800, 7800, and 9800 if they could. I am told that the net effect of the new head, together with the new inkset, is to substantially reduce clogging, compared with the SP4800, 7800 and 9800.
B) "More advanced active meniscus control (AMC)" to further improve dot regularity and placement, and to further reduce the formation of "satellites", i.e. tiny, unintentional droplets that mess up the intended pattern. I don't know whether overall nozzle clogging rates will be lower than the prior generation, given that the head surface coating helps in this regard, and the new inks, with their apparently much higher pigment loading and "more aggressive" encapsulation technology may hinder this situation. Presumably living with the new machines will not be any tougher than living with the prior generation has been with regard to clogging, and hopefully clogging will be reduced overall for both types of papers -- photo and fine art.
The advent of Active Meniscus Control occurred with the heads of the SP4800, 7800 and 9800 series. In this new SP4880, 7880 and 9880 series, the head is further improved, with better AMC, which is improved yet again in this respect in the 11880 head. The cumulative effect of these improvements, by that third generation of AMC technology is stunning, as evidenced by the pictures shown below and by a QuickTime animation that Epson made which shows how this technology works. Dot placement accuracy in the third generation of AMC is said to be 10 to 100X more precise than pre-AMC heads, and the micrographs and short movie support this claim well. I can't say a lot about exactly how much each of the first two generations of AMC did for satellite reduction and especially for drop placement accuracy, but AMC is clearly a big deal for inkjet printers. If the foundation of the entire image-forming process works with far greater precision, clearly the net result is going to help print quality, given screening that takes advantage of it. I have more details on AMC below in the section about the 11880.
Active Meniscus Control means that the ink that's left in the nozzle as a droplet leaves the nozzle has its oscillations dampened by intentional counteracting movements of the piezo device, so that the ink at the nozzle surface remains essentially flat across the opening, and largely devoid of motions that would otherwise cause the next droplet to emerge off course. Absent this active control, the ink naturally bounces around like a good-sized water balloon that's just been whacked, and the in and out and side-to-side bouncing is very bad for making the next droplet hit its target. Hopefully the animated AMC video will be released by Epson and you will be able to see for yourself what I'm trying to describe.
2) Better screening: "AccuPhoto® HD Screening™" (See the comparison pictures below -- it's a big improvement for all the new machines.) This is essentially the same screening that appeared with the 3800, but with a new name -- it was previously described as "ultramodern photographic screening". This kind of screening advance will most likely be appreciated when the demands for fine detail from an image are at their highest, i.e. when making relatively small prints, when printing text, when we need perfectly smooth gradients, both in color and monochrome work, and perhaps also when taking advantage of bi-directional printing.
I no longer see linear artifacts under 4X magnification with the new screening at 2880 dpi, and clearly the image detail/resolution is improved. The graininess seems to be largely unchanged -- barely visible under a 4X loupe. There is apparently no change in the paper drive mechanism and therefore the screening and the improved Active Meniscus Control of the head are working their improvements independently of any improvement in the precision of the paper feed process.
In the 11880 and probably also the other new machines, the default gray gradient in color mode is even smoother than the already outstanding raw state gray gradient of the 9800. This time I can hold the gradient 6 or 8" from a SoLux 50-watt halogen lamp and still not see irregularities in the ramp. I have not yet examined the gray gradient quality in Advanced Black & White mode.
3) *This paragraph was updated with new information October 23, 2007: A new inkset: "Epson UltraChrome K3™ with Vivid Magenta Ink Technology", which is quite a mouthful, though sometimes Epson says "UltraChrome K3 with Vivid Magenta". I should think that "UltraChrome Vivid Magenta" will be a good way to refer to it in casual conversation. Or maybe just plain "the Vivid Magenta inkset". The two vivid magenta inks are again, unfortunately not compatible with any of the prior printer models, because they would ruin the print heads of older printer within six months. The only pigment that got replaced is the magenta (used in both magenta inks). No other changes were made to the inkset for these three new machines, and cartridges sold for them other than the two VM ones are labelled as being for use in the 9800 family as well as the 9880 family. On photo papers, the new magenta inks yield a considerable increase in gamut in the blue-to-magenta range (up to 22% more chroma), with a little spillover gain in the blue-to-cyan and magenta-to-red ranges, and the Dmax and the gamut of colors near Dmax has improved considerably.
Inksets are complicated animals and they bring with them a broad range of characteristics. Gamut, resistance to light fading, surface gloss, gloss differential, bronzing, metameric color shifting, particle settling rates, coverage rates, humectant load, and a lot more.
The total gamut volume of the best profile for Luster (260) that I can make for the 11880 and the Vivid Magenta inkset is 7.6% better than the total gamut volume of my best profile for Luster (250) and the 9800. I suspect that if the paper were not a variable, the difference would be more like 9%, because this new paper is dimmer, even absent UV light in the measurement process (the new paper fluoresces far less, about 1/4 as much). The gamut increase for the other three machines is probably a bit less.
Gloss differential on Luster (250) appears to be substantially reduced, compared with UltraChrome K3, which was already relatively good. The Vivid Magenta inkset does seem to be glossier overall. Epson attributes this to the new "high-gloss Microcrystal Encapsulation™ Technology". The degree of bronzing is quite similar, with certain density ranges of magenta ink in particular contributing the most of the golden surface reflection that can be seen in ramps of the six primaries.
*This paragraph was updated 10-23-07: In the 11880 but probably not the other new machines, all six primary colors in the raw state of the printer are quite a bit different from those of the 9800 with the original K3 inkset. All six look darker and seem more saturated, portending a gamut on photo papers which includes noticeably more of the darker colors, historically the realm of dye gamuts. Coupled with the improved gloss of the new Luster (260), the effect is one of quite luscious-looking test forms and prints. The magenta, blue and red primaries will obviously be quite improved with the 9880 family of printers due to the new magenta pigment, but the other three primaries will almost certainly look the same as the last generation.
Completely stable color, with no short-term drift is claimed. I have not done systematic measurements to verify this, but short- and long-term drift was already negligible with the old inkset.
Improved scratch resistance is claimed as a facet of the new inkset, however this may be a reference to the improvement made with the first K3 inkset. I have not tested this yet either.
The highest achievable Dmax is said by Epson to be "2.55 (L* = 2.9)", whereas previous claims for UltraChrome K3 were in the range of 2.25, if memory serves. My tests with the 11880 indicate that the default settings with either Luster paper -- the old (250) or the new (260) -- yields a Dmax of roughly 0.12 higher with the default driver settings with the new inkset. But to really know what's up with paper Dmax, one must explore the behavior of the system when using driver settings that put more ink down, including alternate paper tables and/or by using the Color Density control.
*Again, my own observations here come mainly from working with the 11880, but also from examining profiles for all of the new machines, which show that with regard to gamut and Dmax the other new machines match the 11880's performance fairly closely.
With both the prior and the new system, one can get substantially more Dmax by using the Color Density slider, but one can get into trouble by putting too much ink down too fast, particularly in colors near black, which can cause the surface gloss of the inks to fail and become obviously matte. This is image-dependent, print size dependent, etc. Both inksets exhibit this as a limiting factor to Dmax, however, one should also consider the effect of using more ink on the gamut, as this effect can be both positive and negative, depending on how much you push the ink and on which colors you're talking about. One bit of good news is that the new Luster (260) can take more ink without this failure occurring than the old Luster could, and this means that one can operate with confidence using a more pushed Color Density setting such as +10 to +15 and avoid getting into trouble when printing images with large areas of dark shadows.
So, can the new inkset produce higher, usable Dmax on photo papers? In my experience, if you consider only driver settings that are safe for all of my images at least, then yes, it can. I can get up to a safely usable Dmax of about 2.46, plus or minus a couple of points, which is about what I could do before, but the good news is that because of the new paper, I will be able to print that way all of the time, instead of having to avoid it with darker images or big prints where I didn't want to take a chance of ruining the print. A Dmax in that range is really excellent, well beyond silver gelatin black & white or Cibachrome, at their best.
The best Dmax I can get from Luster (260) (by using Color Density +15 and the Luster (260) driver choice) is an L* of 2.86 with about 1.5 hours of drying time, a superb black. That's a Status T density of 2.48. After a day or so, the same print reads L* 3.11 and there was probably a bit of microscopic dust degrading that reading. Higher densities are possible but are likely to run afoul of spoiled deep shadow detail when printing with the profile and spoiled gloss in very dark colors in some prints. It looks as though I'll be able to reliably stick to this printing setup with increased density in the darker colors: I've just given this +15 profile it's acid test and there was no loss of gloss, as expected, with my toughest image (the most dark shadows). So the new system does have substantially better black, as a practical matter, and it's attributable to both the new paper and the new inkset.
For the four measurements listed next, CD refers to the Color Density setting in the driver. The Luster (260) media choice was used in the driver. Each media choice evokes a table which affects overall ink use, tonality, and sometimes gray balance, as well as paper feed rates and paper thickness settings.
Luster (260) measured white at CD +15, Spectroscan, w. UV filter: 93.43 -0.57 -3.01 Fairly dim and bluish.
Luster (260) measured black at CD +15, Spectroscan, w. UV filter: 3.11 -0.13 -0.97 Superb black, very slightly bluish.
Luster (260) CD +00 measured white: 93.11 -0.6 -2.99 Same white as before.
Luster (260) CD +00 measured black: 4.33 -0.11 0.35 Weaker but still very good black.
Luster (250) white, Spectroscan, w. UV filter: 95.26 -0.78 -1.75 Two L* units lighter than the new paper.
Luster (250 black from 9800 with best, usable driver setup*: 3.97 -0.135 -0.37 Compare with 3.11 black above. (* UltraSmooth Fine Art media setting and CD = +5)
Luster (250) black from 9800 with totally safe driver setup (default**): 5.29 -0.72 0.95 Compare with 4.33 black above. (** Premium Luster (250) media setting and CD = 0)
Despite the dimmer white shown in the spectrophotometer readings, compared to the old Luster (250), I am favorably impressed by the new Luster (260). Compared to its predecessor, it's got roughly 1/4 of the fluorescence under a black light from optical brighteners, so it should be pretty much free of the bothersome, short-term yellowing that the old luster would do on display, plus it's a bit glossier, both of which I had always wanted. And it's nearly 10% thicker, measuring at 0.0108". The full rolls are both noticeably bigger in diameter and heavier. I can see that it's dimmer, but it's not obvious.
Again, as with the earlier K3 inkset, there is little or no improvement in the Matte Black Dmax performance that I can detect on a paper like Hahnemuehle German Etching 310 (still just 1.63 is the very best I can get with any driver settings, none of which can improve the Dmax compared with the default settings of Color Density = zero, with either the UltraSmooth Fine Art or the Velvet Fine Art driver tables). The absence of any gain here is my main disappointment with the system.
My second disappointment is not getting a more permanent yellow that can nevertheless give us the excellent gamut of this yellow. Increasing the yellow's resistance to light fading could increase the longevity of the prints by roughly double, because the yellow is the weakest link. Permanence ratings will most likely be again unchanged, but the gamut is now the best gamut in the history of printing, that I know of, even exceeding the old IRIS ID inkset gamut. It's possible that some of the relatively rare Hi-Fi color solutions for inkjet and/or lithography which include extra primaries could rival or exceed this gamut, all things considered, but I'd be a little surprised to see that. In any case, out of gamut issues have become pretty minor in my own body of work.
To get a sense of which colors I'm talking about (as constrained by sRGB and your monitor's gamut), have a look at my site's portfolio of 118 images, still consisting solely of film captures: http://www.josephholmes.com/gallery. I'm pretty sure that over time, as I fold in more and more digital captures, the range of colors that I throw at the printers will change, but I don't know yet exactly how.
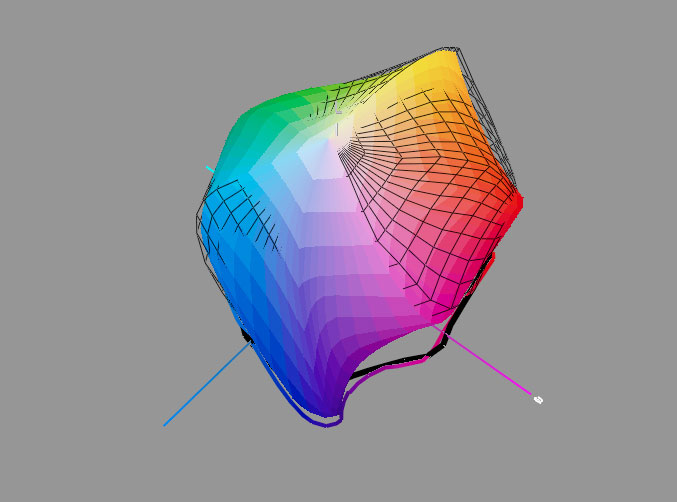
Here are two gamut views which compare the UltraChrome K3 inkset, with the new UltraChrome K3 Vivid Magenta inkset. The wireframe is the newer result.
 |
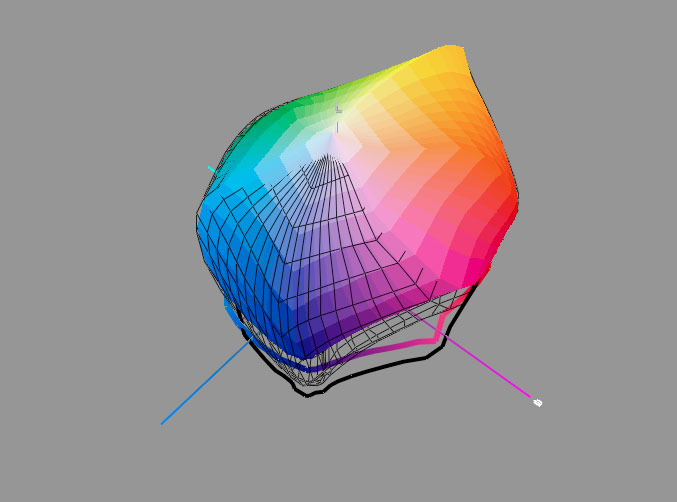 |
Details: 9800 with UltraChrome K3 inkset, Premium Luster Photo Paper (250), UltraSmooth driver setting, and Color Density setting at +5 (my favorite setup on the 9800 for best general printing quality, so long as no large, heavy shadows appeared in the image, otherwise I used a less flattering setup) vs. 11880 with UltraChrome K3 Vivid Magenta inkset, Premium Luster Photo Paper (260), Luster (260) driver setting and Color Density setting at +15 (again, my favorite setup on the 11880 for best printing quality, but a setup that I am fairly certain will work for all images -- i.e pushing the Dmax envelope less while still getting better results -- L*3 instead of L*4). Note that the apparent advantage of the older inkset in many of the lighter colors is due solely to the prior paper type being about two percent brighter. For a still more detailed comparison, download movie #2, below.
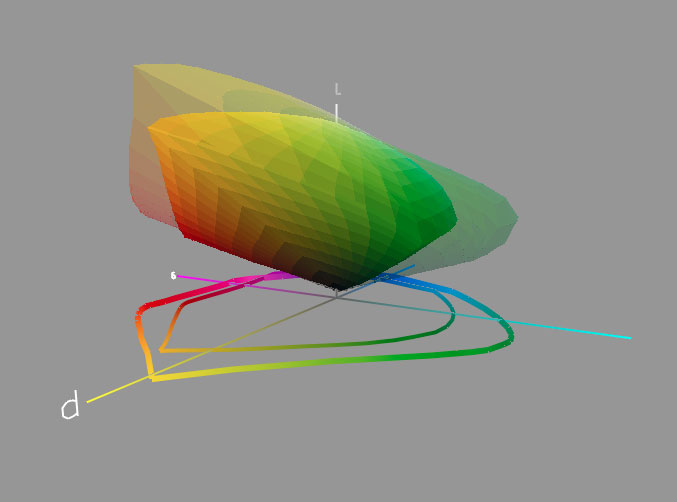
And here are two gamut views which compare the new inkset (same details as above) with a LightJet + Crystal Archive combination, based on a first-class setup done by my friend Bill Atkinson and Calypso Imaging in May, 2005. For a more detailed comparison, download movie #3 below.
 |
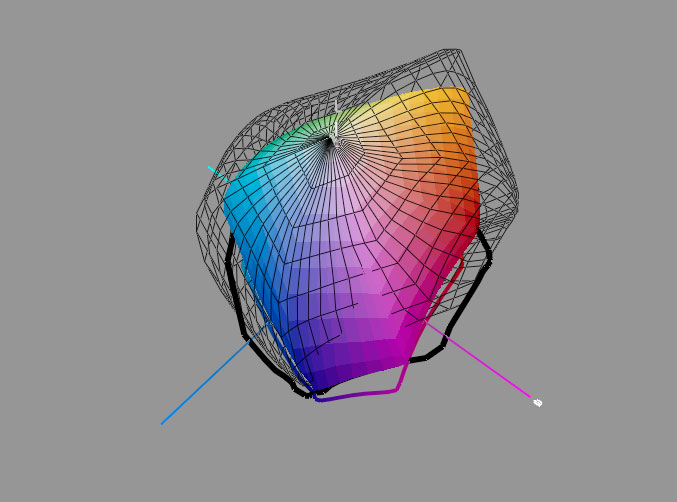 |
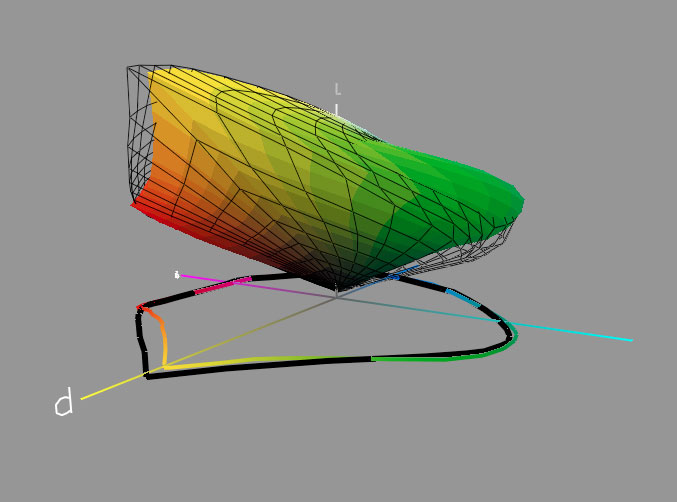
And finally, the following are two gamut views comparing the Epson Stylus Pro 11880 with the Canon proGRAPH iPF5000, with each using the exact same paper type, Epson's Premium Luster (260) and with each optimized for best output by their respective owners (myself and John Hollenberg). The Epson gamut is shown in wireframe. For more detail of this comparison, download movie #5 below.
 |
 |
GAMUT MOVIES:
The following nine movies of eight 3D gamut comparisons are available as zipped, QuickTime movies by clicking the links below. They will download to your hard drive and should play automatically in QuickTime Player (I hope and expect they will work on Windows too, so long as you have Apple's free player). Please only take what you can use as the files are large. All of these comparisons are intended and carefully chosen to give meaningful comparisons with a minimal level of effect on the results from uncontrolled or irrelevant variables, however, so many things can affect gamut volumes that any such comparison must at least be seen as something which is unlikely to be entirely repeatable.
Another thing which is important to try to understand while looking at gamut models is basically which color is which. Some colors appear in photographs much more often than others and are therefore more crucial to be able to print. My own experience, which is largely dominated by landscape photography, but also by the design of RGB working spaces for digital capture, during which I carefully and systematically took artificial colors into account as well, has shown that the more critical color ranges for having relatively high gamut include the yellow to red range, and the sky blue range, whereas the pure green to cyan and the magenta to pure (royal) blue range are less important. In light of these observations, the latest Epson system color gamut (inkset plus photo-style paper plus dot placement) is particularly strong, well beyond what the indicated gamut volumes alone would suggest.
The best test is often to try soft proofs and gamut warnings with your own pictures by using representative printer profiles. Do keep in mind that there are many things that can affect gamut: a few that can affect it a lot with a given inkset, particularly the choice of paper, and in some cases major driver settings such as the choice to check No Color Adjustment in an Epson driver (which you generally should), and a bunch that can affect it a little, including: drying time, ink particle settling, measurement error, dust, viewing light, dot placement accuracy, ink batch variation, paper variation, other driver setup choices, and more.
#1) Download Description File of all movies. More details are provided in this zipped RTF file than are provided here, and you can store the RTF with the .mov files for later reference.
#2) 476 KB download: Stylus Pro 11880 Premium Luster (260) vs. Stylus Pro 9800 Luster (250): Gamut volumes are 784,159 and 729,871, respectively. Both profiles are mine.
#3) 244 KB download: SP11880 Luster (260) vs. LightJet Fuji Matte: Gamut volumes are 784,159 and 549,898, respectively.
#4) 532 KB download: SP11880 Luster (260) vs. SP9600 Luster (250): Gamuts 784,159 vs. 706,233. SP11880 is in wireframe, both profiles are mine.
#5) 588 KB download: SP11880 Luster (260) vs. Canon imagePROGRAF iPF5000 Luster (260): Gamuts 784,159 vs. 731,570. Epson gamut is in wireframe, SP11880 profile is mine, Canon profile courtesy of John Hollenberg.
#5B) Same as #4, but with Epson's gamut being shown as solid, and Canon's being the wireframe
#6) 536 KB download: SP11880 Luster (260) vs. HP Designjet Z3100 Professional Satin: Gamuts: 784,159 vs. 761,915. The Epson gamut is in wireframe, the Epson profile is my own and the HP profile is by Charlie Cramer.
#7) 536 KB download: SP11880 Ilford Pearl vs. HP Z3100 Ilford Pearl: Gamuts: 784,095 vs. 654,881. The Epson is in wireframe, profiles courtesy of Charlie Cramer and Bill Atkinson
#8) 500 KB download: SP11880 UltraSmooth Fine Art MK ink vs. SP9800 with same: Gamuts: 463,711 vs. 431,873. The SP11880 is in wireframe, and both profiles were supplied by Epson America.
#9) 440 KB download: SP11880 PhotoRag MK vs. Canon iPF5000 with same paper: Gamuts: 480,841 vs. 479,848. The SP11880 is in wireframe, both profiles are courtesy of Stefan Fiedler
Here is an interesting URL for info on various aspects of Epson's ink and cartridge characteristics: http://www.epson.com/cgi-bin/Store/Landing/InkTechHome.jsp
4) Built-in 10/100 BaseT ethernet, where previously an ethernet card had to be purchased, plus USB 2.0, where previously FireWire 400 was supplied. FireWire is now gone. The maximum length of a FireWire cable, without using a repeater, was 4.5 meters. USB 2 can reach 5 meters, in a single throw, at a theoretical maximum of 480 Mb (small b means bits, big B means bytes!) per second. Actual max USB 2 speeds are half that or less, i.e. 30 MB/sec -- more than sufficient for printing, of course. FireWire 400 max speed is theoretically 400 Mb/sec, i.e. 50 MB/sec and actual max is around 40 MB/sec, tops.
| Stylus Pro 11880 | ||
 |
The changes included in the new SP11880 include all of the applicable changes of the three smaller machines, plus:
*The following long paragraph was added October 23, 2007: First, a note about the inkset and apparent differences between that for the SP11880 and that for the 4880, 7880 and 9880, as well as with the 4800, 7800 and 9800.
Apparently, none of the inks, except for the two Vivid Magentas, used in the SP11880 are precisely identical to those in the other new machines, however, they are very close, and use the same pigments. The pigment loading of the 11880 inkset seems to have been increased substantially, because all of the six primary colors in the raw state of the printer are much darker and generally richer looking on photo paper than they were from the 9800, or it could be the driver putting more ink down by default, or it could be a change to the encapsulation technology used in this version of the VM inkset, or both, or something else, or any of the above, but this difference is striking. It may have a small effect on the darker colors gamut or the ratio of humectant to pigment in the print -- it's hard to say. It may be a direct consequence of the new head technology used in this machine (see item #3 below). Compared with the 9800, the 11880 inkset, on photo papers yields a considerable increase in gamut in the blue-to-magenta range (up to 28% more chroma), with some spillover gain in the blue-to-cyan and magenta-to-red ranges, plus some surprising gain in the green range (around 4% at most) and a small loss in the red-to-yellow range (about 2%) with the default profiling/driver setup, or a slight gain in the setup I choose for Premium Luster (260) -- that being to use the Luster (260) driver table and to set the Color Density slider at +15. The Dmax on Premium Luster is very much like that of the other new 80 series machines and a considerable improvement on the already very good 9800 family performance. The gamut of the 11880 looks to be about 4 percent better in the pure blue and the green ranges than that of the other new machines.
1) Sixty-four inch wide sheet and roll paper capability (most roll papers from Epson now come in 60" rolls, but a couple will come in 64" rolls instead -- Enhanced Matte and Doubleweight Matte.
2) "Media Bar Code Tracking and Identification System" This is a bar-code-like labelling by the printer of roll stock inserted into the machine, entirely at your option. At the expense of 80 mm of paper wasted each time you load a roll into the printer, upon your preparing to remove a roll from the machine, it will mark a code fairly close to the end of the roll which tells the printer, when the paper is later reinserted, how much paper remains on the roll, what kind of paper it is, and I think a few other things as well.
Having first gone into the LCD menus on the printer and set up the marking options you want, when you load a roll into the machine, it asks you to choose the paper type from a list and to verify the roll length (e.g. 30.5 Meters for a 100 foot roll). Later, when you decide you want to remove the roll, you need to press and hold the Return button at the center of the keypad buttons for three seconds. The printer prints the bar-code like markings along the end of the roll, then allows you to pull out the paper release lever to unload the paper. Next time, when you put the paper in, it scans the paper with the print head and doesn't ask you what kind or how much paper there is on the roll, because it knows from reading the code. Before it makes a print, it cuts off the markings and an 80 mm wide strip of paper falls out of the machine. The cycle repeats. You loose 3+ inches of paper for each time you take the roll out of the printer or when you power down the printer and turn it back on again. The paper loss seems like the only drawback. I'd much prefer to see the amount of paper used cut considerably (no pun intended).
When you insert sheets of paper into the 11880, it asks you which kind of paper is being inserted. I am told that this system never overrides settings in the driver (at your computer). I'm still not clear about the advantages of this new system, as it seems redundant to driver settings.
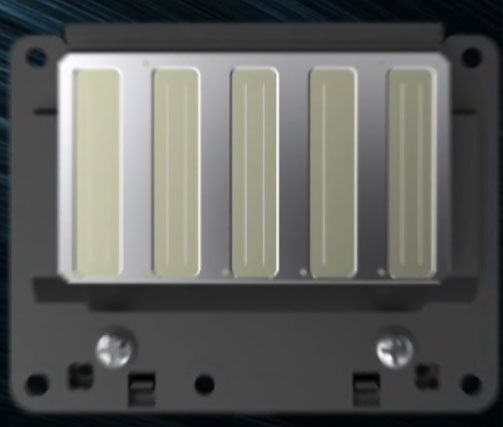
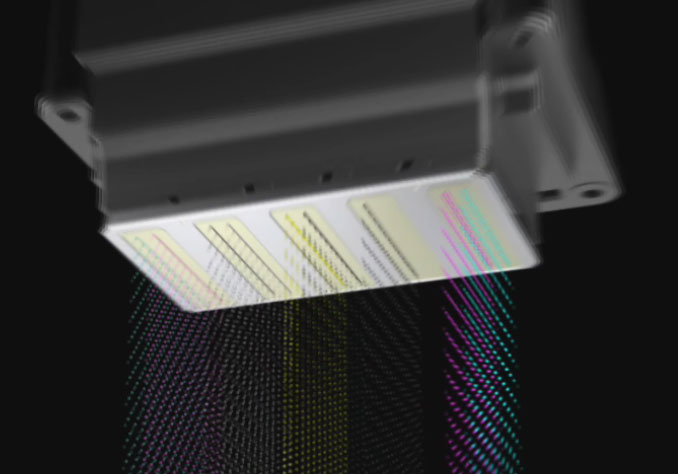
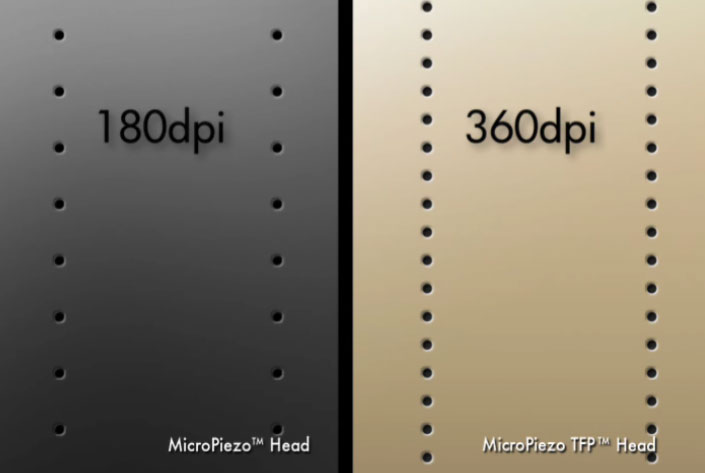
3) "9-Channel Epson MicroPiezo TFP™ Print Head" 360 nozzles in each of the nine, one-inch columns of nozzles! The Thin Film Piezo head can greatly increase the resolution because, dot placement is 10 to 100X more accurate, and it can print twice the dots per pass of all prior generation of print heads. It is a more expensive head, with even more advanced active meniscus control than the MicroPiezo AMC heads in the other new machines. The improved AMC is what yields the improved placement accuracy, elimination of satellites, and the consistency of droplet size.
The phrase "Thin Film Piezo" refers not to the film of ink printed by the head, rather to the piezo material itself. After many years of research into this, Epson has managed to create a new kind of piezo device to power the ink motions in the TFP print head which is 25X thinner than the prior piezo device. This makes it far more flexible. This flexibility in turn means that a larger volume of ink can be moved for a given width of piezo, which in turn means that the piezo can be made much narrower and still deliver enough ink. Which in turn means that you can cram 360 nozzles into one inch of head height, instead of 180. And at the same time have the power and control to perform superior meniscus control, which gives you more perfectly formed and more accurately placed dots. Very cool. This article from SEC in Japan has very interesting diagrams and more: http://www.epson.co.jp/e/newsroom/2007/news_20070327.htm
Here are some of Epson's photos and illustrations that show views of the TFP head surface, showing the layout of the nine columns of nozzles:
 |
 |
4) Another innovation of the 11880 is that the return speed of the head while printing in Uni-D mode ("high speed" off) has been greatly increased when the prints are wide. The return speed is now 3X faster than the printing speed, instead of being roughly 1.2X faster, for prints wider than some width between 18 and 30" (I have not tried to narrow this down yet). This alone can cut as much as 1/4 off the total print time when making larger prints in Uni-D mode.
A few speed test results:
SP11880: 68 seconds per inch of 43" wide image at 2880, Uni-D. (my test).
SP9880: 83 seconds per inch of 43" wide at 2880, Bi-D (Epson's test). Notice that without the high-speed head return, Bi-D printing on the new 9880 is actually slower than Uni-D printing on the 11880. Print speeds of the 9880 are presumably the same as they were with the 9800, or at least very close.
SP11880: 4:03 to print a small image, 6.25" w. x 8.33" high at 2880, Uni-D. SP9800: 5:25 In this test, the return motion is no faster in the 11880, and the overhead of taking the print head to its rest location means the total speedup is as small as one will see for the new printer. Large print results with the 11880 fall into the range of 1.9 to 2.6X faster than the 9800 at 2880 dpi, based on other tests which are not my own, but these results make sense in light of the head return speed and having twice as many nozzles.
5) "Auto Nozzle Verification and Cleaning System" detects clogged nozzles via testing, either before each print or at regular intervals, using a new, charged-droplet method and automatically cleans the the affected fifth of the head (uses only one or two colors of ink instead of all nine). So far I haven't had any clogs, but time will tell. This system is expected to eliminate clogging troubles almost entirely. My old 10000 was very reliable in this respect, compared with the 9600 and 9800, because it used an expensive laser system to check the droplets and deal with troublemakers automatically. This new system is doubtless an improvement on that one.
6) Nine cartridges of 700 mls each, installed and nine sets of nozzles in the head, with real-time switching of black ink modes (MK to PK and back). The driver just lets you select from either ink in the case of the matte paper selections in the Media pop-up, but only lets you use the Photo Black ink with the photo papers. Instant changing and no waste. These cartridges are about the size of the current 220 ml cartridges and much smaller than the 500ml cartridges of the 10000. (pictures below)
7) "Standard USB 2.0 and Gigabit Ethernet (10/100/1000 BaseT)" Built-in FireWire is now gone, and the ethernet is standard, as with the smaller new machines, but in the 11880 it includes Gigabit speed.
8) "Printer Activity LED Lighting System" is a series of amber LEDs that glow above each cartridge, which are used for a variety of purposes. One is that when a cartridge needs replacing, its light turns on to point the way to the right cartridge to remove. It's a detail, but it's cool. As always, it's impossible to put the wrong cartridge into a slot. Oh, and now, the ink cover doors are opened electronically by pushing a button on the door -- no more accidentally popping the doors open each time you bump into them.
Somebody with good taste in television built an Easter egg into the 11880 after realizing a certain similarity between the amber LEDs and the "toasters" of Battlestar Gallactica. Entering "Maintenance Mode", by starting the printer with the Pause button held down, allows you to set "Sylon Mode" (deliberately misspelled no doubt to keep the lawyers away), which makes the amber LEDs blink back and forth like the visor of a metal Cylon. :-)
9) I am told that standby power in the 11880 is down to about 0.5 watt now, half the already excellent 1 watt of the 9800 series, and roughly 10X lower than HP. Seiko Epson Corporation has a distinguished history of actively pursuing critical environmental goals, including successfully leading the push to stop Japanese industry from using CFCs to preserve the stratospheric ozone layer. Minimizing power waste is crucial to keeping the climate friendly. Here is an interesting story about Epson's new commitment to making papers only from pulp from sustainably managed forests: http://www.epson.co.jp/e/newsroom/2007/news_20070529.htm#1
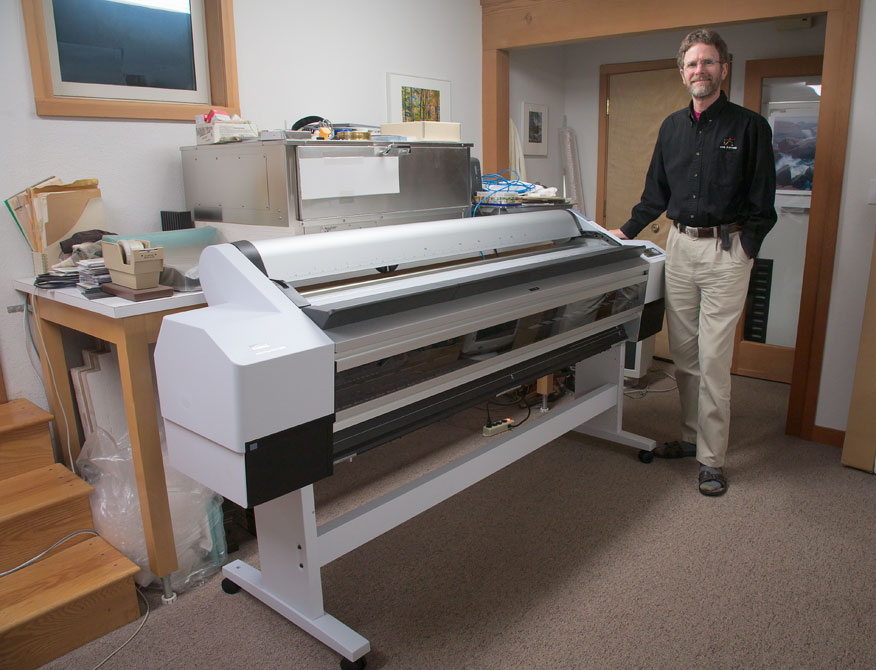
10) The entire sense I get from the 11880 is of it being a much beefier machine. The sounds it makes are more solid than those of my 9800, and the chassis is stronger and heavier per foot of length. Indeed the printer, minus the stand weighs roughly 360 pounds -- a serious load for four people just to lift, let alone carry anywhere. The paper cover is 1/8" thick aluminum instead of plastic, and the front door has aluminum extrusions across the top and bottom, much beefier hinges, and is far more rigid, despite being wider. The stand is made of heavier gauge steel and the casters are larger to support the extra weight well.
11) Table-top shelf space on top of printer -- great for putting stuff down! I loved this feature of the SP10000, and it's even better in the 11880. Don't you find that you often need to set little stuff down as you're working with a wide-format printer?
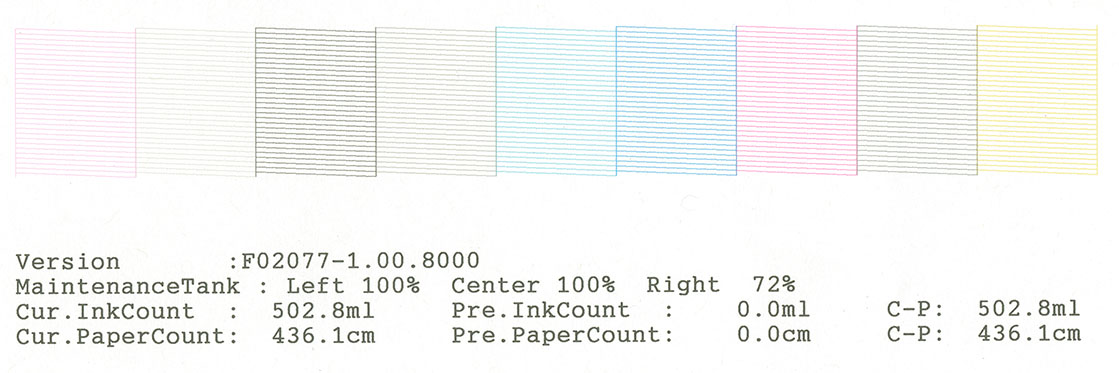
12) Another innovation of the 11880 is that head cleaning can now be carried out in five separate sub-groups! In other words, instead of having to waste ink to clean all the nozzles when just one color shows a clog, you can now select, from from one of five choices on the LCD on the 11880: Menu > Maintenance > Clean Each Color: C/VM, PK, MK/Y, LLK/LK, or VLM/LC! Yay! At this point, the Mac driver, shows no evidence of implementing this feature from the computer. Note that I prefer to do my nozzle checks on 8.5 x 11" sheets of plain laser paper, inserted vertically. I check the yellow with a Schneider 4X loupe so I can see it well enough. The nozzle check pattern from the 11880 is mindblowing for the huge number of nozzles in the pattern. It's quite a departure from what we're used to seeing. Here it is:
13) Another improvement of the 11880 is that the two ink cover doors are automated now, so they don't pop open when you bump into them, as tended to happen pretty easily with the 9800. To open a door, you have to push a button, then the system electrically unlocks the door and pops it open for you. This is among the many little deluxe features that can be put into a more expensive machine.
14) Last by not least, the price, as you may have guessed or already heard, is a lot higher than the usual 44" prices: In the U.S. it's $14,995. In the UK it's £9995. It is supposed to ship, at least in the UK, if not here in the States, in September.
Here I am with my latest favorite printer shortly after getting it into my studio -- not a trivial job, owing largely to its impressive mass:
 |
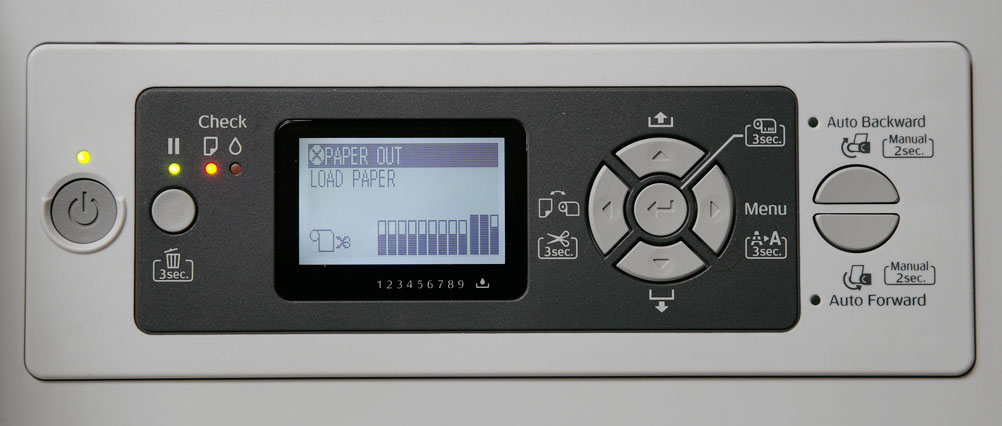
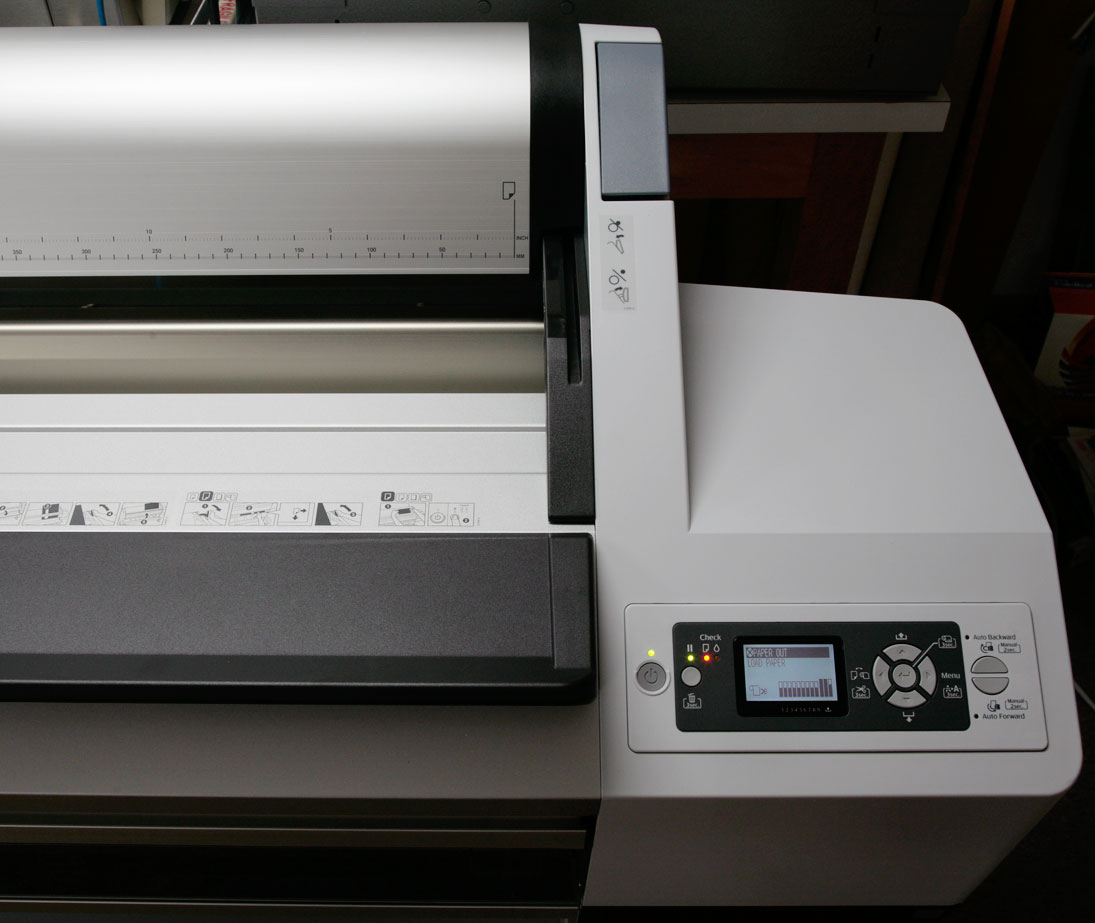
And here is the new control panel on the SP11880, which I find to be their best yet:
And here is a wider view showing the right side of the SP11880 in more detail:
Detail from my printer evaluation target, printed on the SP9800, and again below, printed on the SP11880 (story follows):
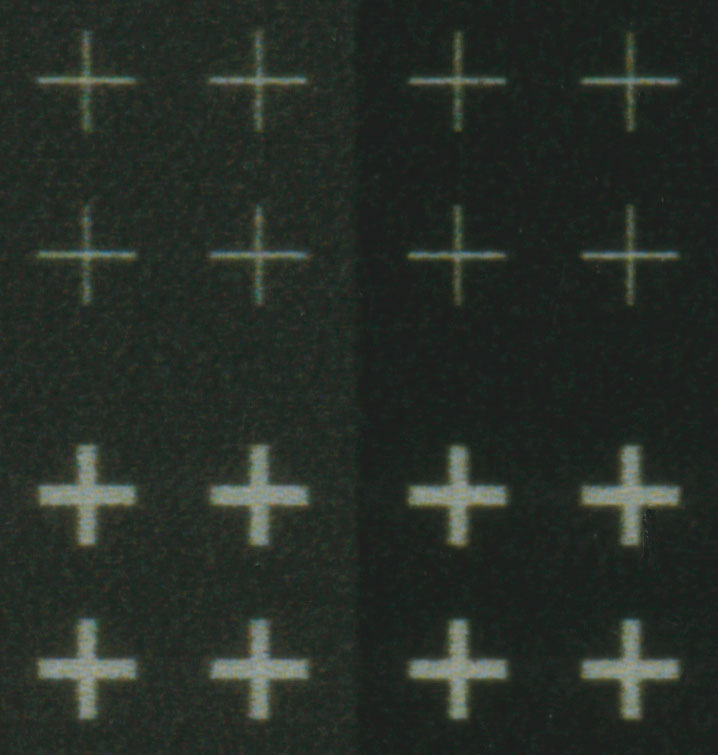
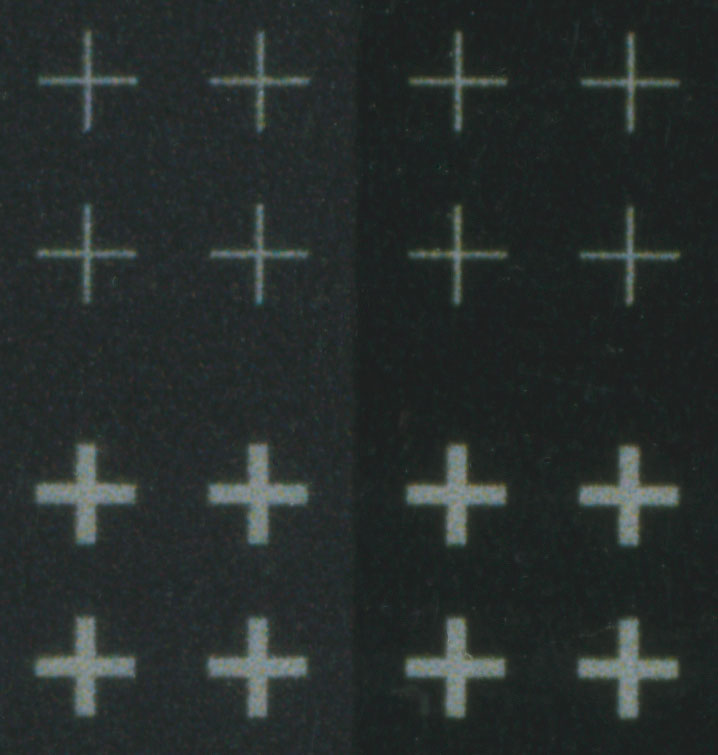
These reasonably well-focussed, but still somewhat blurry, flatbed scans, done at 2400 ppi, of actual prints from my 9800 and my 11880 (below), were not scaled after scanning. They show a large increase in resolution in the direction of head travel (left to right), in the 11880 result. The magnification of these crosshair images is between about 24X and 30X life-size on your monitor.
The prints are on Premium Luster (250) from a file set to 360 ppi in Photoshop (no scaling done there either). This means that when printing these at 2880 dpi in the driver, the native resolution of the printers was 720 ppi. Therefore the scaling done in the driver was limited to a doubling of the pixels by replication, which perfectly preserved the image detail with the Nearest Neighbor interpolation done by the printer driver.
In my original drawing, the finer crosses at the top are single pixel, gray dropouts against backgrounds of RGB (40, 40, 40) and (0, 0, 0), drawn to simulate fine detail in shadows. So at native printer res, the lines of the fine crosses are actually two pixels wide. The larger crosses are 3 pixels in the original drawing, therefore six pixels at native printer res of 720 ppi. The distance between crosses in the print is 1.83 mm or 0.072". The lines in the fine crosses, if printed perfectly, would then be 0.07 mm or 0.0027" -- 2.7 thousandths of an inch.
It's interesting that the overall horizontal vs. vertical resolution is much more even (symmetrical) now in the 11880, and surprising that the resolution gain seems to be pretty much limited to the horizontal direction, despite the finer screening and more accurate dot placement of the 11880. You can also see a shift in the lightness and color balance of the raw state provided by the driver tables, with the 11880 printing darker and cooler. This was printed raw, without using profiles, and using the No Color Adjustment setting, as usual. In a profiled print, the tonality would be much more open.
Below are a pair of continuous tone image details, from prints made on the 9800 first, and then the 11880, below, both scanned on a flatbed scanner at 2400 ppi and shown at 100 percent. They are again roughly 24X to 30X enlargements, depending on your monitor resolution. Notice in the 9800 result the many vertical line artifacts that are visible (the head travel is vertical in this case, top to bottom), but in the 11880 no such lines are visible. Also notice the improved resolution in the 11880 result. The apparent graininess is greater from the 11880 though, but being darker, one would expect some of this, especially given that the droplet sizes from the new machines are unchanged, although this seems to contradict the finer grain-like structure of the illustration from Epson which follows these two.
SP9800:

SP11880:

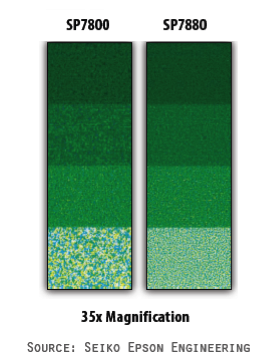
Here are sample smooth patches printed and scanned by Epson, comparing the 7800 with the new 7880. This exact same image has previously been published as a comparison between a 4800 at the left and a 3800 on the right. The point is correct in both cases: the initial jump in screening technology to the new "AccuPhoto HD Screening" actually occurred with the introduction of the 3800 several months ago, and continues with its introduction into the 4880, 7880, 9880, and 11880. Obviously its a major change for the better. I don't know if these samples were printed at 1440 or at 2880. They may be tinted green because a green filter was used to help reveal magenta dots better.
 |
And here is the amazing dot quality image -- incredible roundness (for dots of this tiny size -- see below), incredible consistency of size and shape from dot to dot, and incredibly repeatable location -- a nearly flawless grid of columns and rows is achieved. Not to mention the total absence of satellites! Note that the spacing between the rows and columns in the image at left may have been degraded a bit by inadvertent scaling in the PDF or earlier -- some row spacing variability is visible at left which I don't see in the more zoomed-in section. It is possible, however, that this group of dots was printed without paper movement being a part of the result, i.e. in a single pass. Still, TFP head's printing regularity is amazing. I saw dots this round from the very early Epson printers (mid-1990's) on polyester-base print material, but they were far larger and were applied far more slowly. After that, dot regularity and shape has deteriorated as the prints speeds went up and the dot sizes shrank, but it looks as though we now have the best of speed, size and regularity all at once.
 |
As near as I can tell, these individual dots are between 0.00046" and 0.00032" wide! That's three or four 10,000ths of an inch, or about one seventh or one eighth of the width of the single-pixel cross hairs in the prior illustrations. The entire block of six columns of dots at right is between three and four thousandth's of an inch, or about 1/12th of a mm wide. The entire block of 25 columns of dots at left is about 1/50th of an inch wide, or half a millimeter. Hard to believe, but if the magnification value from Epson is correct, that's the answer. Seriously small.
The new 700 ml cartridge design:
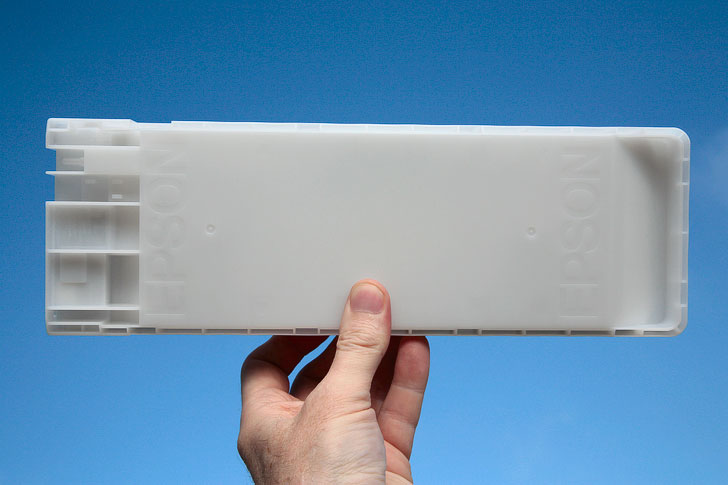 |
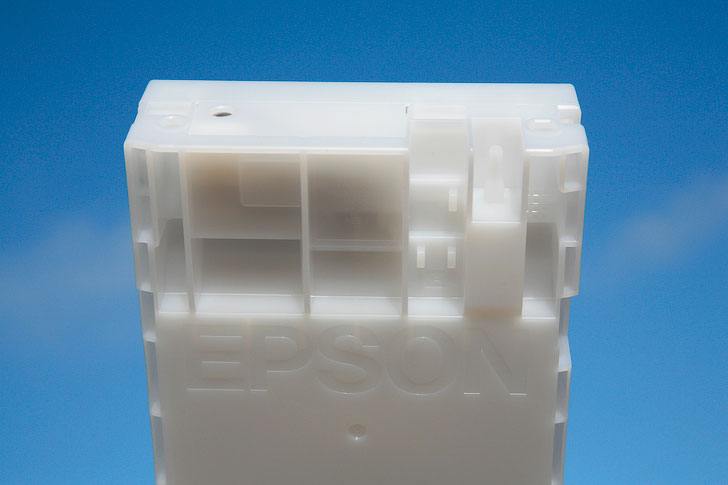 |
Don't expect shipping cartridges for the 11880 to look just like these. They will be labeled differently and will most likely use a different color of plastic, but the altogether new cartridge design is interesting. My hands aren't small, but note how diminutive the thing is, considering it will hold a whopping 700 ml of ink. Also notice that the ink valve is near the top this time, instead of in the middle as it has been for many years. I'm holding the cartridge upside-down in the top picture. The air inlet where air is pumped to pressurize the outside of the ink pouch is near the bottom, visible in the lower picture at right as a tubular post.
I was fortunate to have the opportunity to run an interesting, long-term experiment with the Archival inkset (Epson's first pigmented set) and the 10000, a few years ago. The upshot was that the solid density of the printed inks improved quite substantially by giving the cartridges a very much more thorough (but still very gentle) agitation than that suggested by Epson, prior to installing the cartridges for the first time. I move each cartridge, typically in groups to save time, for five minutes, using a mixture of various motions designed to induce turbulent flow inside the fluid-filled bags inside the cartridges.
And I repeat this five-minute agitation once each six months, with any cartridges which have been in a machine for that long. I mainly lay the cartridge on its side, and rotate it back and forth, clockwise and counterclockwise around it's center, as though it were an LP record and I were doing the hip hop DJ thing, only slower. We don't want to risk damaging the point where the bag connects to the valve! I also keep it on its side, do not rotate it, but instead rock it in a circular pattern to set up waves around the outside of the bag as best I can. I keep reversing the motions and interspersing them with one another, and also throw in the recommended side-to-side motion, with the cartridge on its long edge, i.e. upright. Five minutes each (total)! Unless the rate of settling of the inks has changed since I did that experiment, doing this will both improve the initial solid densities and color gamut just a bit, and will maintain sufficiently consistent solid densities over the likely long life of these giant cartridges to prevent noticeable color shift if it's done each six months. And yes, I do take them out to re-agitate them if needed to stay on that schedule, even though Epson doesn't recommend that. I can't swear it won't do any harm to take them out for a few minutes. Do watch for ink drips (doesn't normally happen) and if you need to store a partially-full cartridge that was previously installed (as when switching between blacks) I'd recommend taping over the opening around the ink valve with some 3M Magic Tape to help keep it from drying out.
I hope and expect to see a cartridge recycling program from Epson America soon, if not worldwide, so hang onto those cartridges!
That's it for now, or as Odd Bodkins would have said "Yahoo inkjet!"
Epson Stylus Pro 11880, 9880, 7880, 4880, UltraChrome K3 Vivid Magenta